KubeSphere 是一个以 Kubernetes 为内核的云原生分布式操作系统,它的架构可以非常方便地使第三方应用与云原生生态组件进行即插即用(plug-and-play)的集成,支持云原生应用在多云与多集群的统一分发和运维管理。KubeSphere 是一个 Kuberetes 的人性化 UI,但又不仅限于一个 UI。本文记录了笔者对 KubeSphere 的初步探索。
准备工作
笔者拥有一个包含 11 个节点的集群,这些节点(私网 IP 地址为 192.168.23.160~192.168.23.170)相互之间可以免密登录,且均不具备公网 IP。
在本机(macOS 10.15)通过 ssh 登录到节点 ubuntu 上获取各节点信息:
k8s@ubuntu:~$ k get no -o wide
NAME              STATUS   ROLES                  AGE   VERSION   INTERNAL-IP      EXTERNAL-IP   OS-IMAGE             KERNEL-VERSION       CONTAINER-RUNTIME
ubuntu            Ready    control-plane,master   27d   v1.22.2   192.168.23.160   <none>        Ubuntu 18.04.5 LTS   4.15.0-112-generic   docker://20.10.9
worker-large-2    Ready    <none>                 27d   v1.22.2   192.168.23.161   <none>        Ubuntu 18.04.5 LTS   4.15.0-112-generic   docker://20.10.9
worker-large-3    Ready    <none>                 27d   v1.22.2   192.168.23.162   <none>        Ubuntu 18.04.5 LTS   4.15.0-112-generic   docker://20.10.9
worker-medium-1   Ready    <none>                 27d   v1.22.2   192.168.23.163   <none>        Ubuntu 18.04.5 LTS   4.15.0-112-generic   docker://20.10.9
worker-medium-2   Ready    <none>                 27d   v1.22.2   192.168.23.164   <none>        Ubuntu 18.04.5 LTS   4.15.0-112-generic   docker://20.10.9
worker-medium-3   Ready    <none>                 27d   v1.22.2   192.168.23.165   <none>        Ubuntu 18.04.5 LTS   4.15.0-112-generic   docker://20.10.9
worker-medium-4   Ready    <none>                 27d   v1.22.2   192.168.23.166   <none>        Ubuntu 18.04.5 LTS   4.15.0-112-generic   docker://20.10.9
worker-small-1    Ready    <none>                 27d   v1.22.2   192.168.23.167   <none>        Ubuntu 18.04.5 LTS   4.15.0-112-generic   docker://20.10.9
worker-small-2    Ready    <none>                 27d   v1.22.2   192.168.23.168   <none>        Ubuntu 18.04.5 LTS   4.15.0-112-generic   docker://20.10.9
worker-small-3    Ready    <none>                 27d   v1.22.2   192.168.23.169   <none>        Ubuntu 18.04.5 LTS   4.15.0-112-generic   docker://20.10.9
worker-small-4    Ready    <none>                 27d   v1.22.2   192.168.23.170   <none>        Ubuntu 18.04.5 LTS   4.15.0-112-generic   docker://20.10.9
在正式安装 KubeSphere 1 之前,需要做一些准备工作。 首先,KubeSphere 需要一个集群级别的 nfs 服务器可用,并且要求基于此配置一个默认存储类(default StorageClass)。 所谓默认存储类,即当我们想要创建 PVC 申请 PV 时,如果不指定存储类别(如下面的示例所示),那么 Kubernetes 会立即通过默认存储类为我们创建一个与 PVC 请求一致的 PV 出来,并与之绑定。 也就是说,配置了默认存储类之后,我们就无需手动创建 PV 了。
apiVersion: v1
kind: PersistentVolumeClaim
metadata:
  name: pvc
  namespace: dev
spec:
  accessModes:
  selector:
  storageClassName:   # 不指定存储类别,本行不写
  resources:
    requests:
      storage: 5Gi
我们通过如下资源清单配置动态供应的默认存储类,读者可以直接 copy 下面的配置,但是需要修改 nfs server 的内网 IP 和共享目录:
# default-sc.yaml
apiVersion: storage.k8s.io/v1
kind: StorageClass
metadata:
  name: nfs-storage             # 默认存储类的名称
  annotations:
    storageclass.kubernetes.io/is-default-class: "true"
provisioner: k8s-sigs.io/nfs-subdir-external-provisioner
parameters:
  archiveOnDelete: "true"       # 删除 pv 的时候,pv 的内容是否要备份
---
apiVersion: apps/v1
kind: Deployment
metadata:
  name: nfs-client-provisioner
  labels:
    app: nfs-client-provisioner
  namespace: default            # 放在默认命名空间下。当然,也可以放在别的空间下。后续的对象要与该 provisioner 放在一个空间下
spec:
  replicas: 1
  strategy:
    type: Recreate
  selector:
    matchLabels:
      app: nfs-client-provisioner
  template:
    metadata:
      labels:
        app: nfs-client-provisioner
    spec:
      serviceAccountName: nfs-client-provisioner
      containers:
        - name: nfs-client-provisioner
          image: registry.cn-hangzhou.aliyuncs.com/lfy_k8s_images/nfs-subdir-external-provisioner:v4.0.2
          volumeMounts:
            - name: nfs-client-root
              mountPath: /persistentvolumes
          env:
            - name: PROVISIONER_NAME
              value: k8s-sigs.io/nfs-subdir-external-provisioner
            - name: NFS_SERVER
              value: 192.168.23.160         # 将节点 ubuntu 做成 nfs 服务器
            - name: NFS_PATH
              value: /srv/nfs4/ks           # nfs 服务器共享的目录
      volumes:
        - name: nfs-client-root
          nfs:
            server: 192.168.23.160
            path: /srv/nfs4/ks
---
apiVersion: v1
kind: ServiceAccount
metadata:
  name: nfs-client-provisioner
  namespace: default
---
kind: ClusterRole
apiVersion: rbac.authorization.k8s.io/v1
metadata:
  name: nfs-client-provisioner-runner
rules:
  - apiGroups: [""]
    resources: ["nodes"]
    verbs: ["get", "list", "watch"]
  - apiGroups: [""]
    resources: ["persistentvolumes"]
    verbs: ["get", "list", "watch", "create", "delete"]
  - apiGroups: [""]
    resources: ["persistentvolumeclaims"]
    verbs: ["get", "list", "watch", "update"]
  - apiGroups: ["storage.k8s.io"]
    resources: ["storageclasses"]
    verbs: ["get", "list", "watch"]
  - apiGroups: [""]
    resources: ["events"]
    verbs: ["create", "update", "patch"]
---
kind: ClusterRoleBinding
apiVersion: rbac.authorization.k8s.io/v1
metadata:
  name: run-nfs-client-provisioner
subjects:
  - kind: ServiceAccount
    name: nfs-client-provisioner
    namespace: default
roleRef:
  kind: ClusterRole
  name: nfs-client-provisioner-runner
  apiGroup: rbac.authorization.k8s.io
---
kind: Role
apiVersion: rbac.authorization.k8s.io/v1
metadata:
  name: leader-locking-nfs-client-provisioner
  namespace: default
rules:
  - apiGroups: [""]
    resources: ["endpoints"]
    verbs: ["get", "list", "watch", "create", "update", "patch"]
---
kind: RoleBinding
apiVersion: rbac.authorization.k8s.io/v1
metadata:
  name: leader-locking-nfs-client-provisioner
  namespace: default
subjects:
  - kind: ServiceAccount
    name: nfs-client-provisioner
    namespace: default
roleRef:
  kind: Role
  name: leader-locking-nfs-client-provisioner
  apiGroup: rbac.authorization.k8s.io
查看上述资源对象是否被成功创建:
k8s@ubuntu:~/learn-k8s/16-kubesphere$ k get sc -A
NAME                    PROVISIONER                                   RECLAIMPOLICY   VOLUMEBINDINGMODE   ALLOWVOLUMEEXPANSION   AGE
nfs-storage (default)   k8s-sigs.io/nfs-subdir-external-provisioner   Delete          Immediate           false                  17h
接下来,我们创建一个 PVC 来测试默认存储类是否可以正常工作:
# test-default-sc.yaml
apiVersion: v1
kind: PersistentVolumeClaim
metadata:
  name: pvc1
spec:
  accessModes:
  - ReadWriteMany
  resources:
    requests:
      storage: 1Gi
可以发现,一切正常运行:
k8s@ubuntu:~/learn-k8s/16-kubesphere$ k apply -f test-default-sc.yaml
persistentvolumeclaim/pvc1 created

# 默认存储类为我们立即创建了一个 PV 并与 PVC 绑定
k8s@ubuntu:~/learn-k8s/16-kubesphere$ k get pv
NAME                                       CAPACITY   ACCESS MODES   RECLAIM POLICY   STATUS   CLAIM          STORAGECLASS   REASON   AGE
pvc-dadcc223-a827-45e4-a5f6-c52fc1658969   1Gi        RWX            Delete           Bound    default/pvc1   nfs-storage             3s
k8s@ubuntu:~/learn-k8s/16-kubesphere$ k get pvc
NAME   STATUS   VOLUME                                     CAPACITY   ACCESS MODES   STORAGECLASS   AGE
pvc1   Bound    pvc-dadcc223-a827-45e4-a5f6-c52fc1658969   1Gi        RWX            nfs-storage    10s

# 删除 PVC 之后,与之绑定的 PV 也会被删除
k8s@ubuntu:~/learn-k8s/16-kubesphere$ k delete -f test-default-sc.yaml
persistentvolumeclaim "pvc1" deleted
k8s@ubuntu:~/learn-k8s/16-kubesphere$ k get pv
No resources found
k8s@ubuntu:~/learn-k8s/16-kubesphere$ k get pvc
No resources found in default namespace.
我们还需要安装 Metric Server(https://github.com/kubernetes-sigs/metrics-server),此处不再展示安装细节。安装成功之后,可以通过 top 命令查看节点或 Pod 的资源消耗情况:
k8s@ubuntu:~$ k top nodes
NAME              CPU(cores)   CPU%   MEMORY(bytes)   MEMORY%
ubuntu            386m         2%     3776Mi          12%
worker-large-2    247m         1%     5269Mi          16%
worker-large-3    158m         0%     5166Mi          16%
worker-medium-1   100m         1%     3290Mi          22%
worker-medium-2   115m         1%     1499Mi          10%
worker-medium-3   206m         2%     2565Mi          17%
worker-medium-4   116m         1%     2785Mi          18%
worker-small-1    100m         2%     1316Mi          16%
worker-small-2    96m          2%     1312Mi          16%
worker-small-3    85m          2%     1246Mi          18%
worker-small-4    107m         2%     1351Mi          19%
k8s@ubuntu:~/learn-k8s/16-kubesphere$ k top po -A
NAMESPACE              NAME                                        CPU(cores)   MEMORY(bytes)
default                nfs-client-provisioner-645fcf5574-75jvn     2m           9Mi
ingress-nginx          ingress-nginx-controller-69bb54574d-fnlmp   5m           243Mi
kube-system            coredns-7f6cbbb7b8-6v7ll                    2m           16Mi
kube-system            coredns-7f6cbbb7b8-f8wrp                    2m           16Mi
kube-system            etcd-ubuntu                                 30m          53Mi
kube-system            kube-apiserver-ubuntu                       85m          328Mi
kube-system            kube-controller-manager-ubuntu              16m          60Mi
kube-system            kube-flannel-ds-7mffj                       3m           11Mi
kube-system            kube-flannel-ds-cfb8h                       3m           14Mi
kube-system            kube-flannel-ds-d576s                       4m           20Mi
kube-system            kube-flannel-ds-hrkhs                       4m           12Mi
kube-system            kube-flannel-ds-hwwwb                       3m           14Mi
kube-system            kube-flannel-ds-kgv7t                       3m           12Mi
kube-system            kube-flannel-ds-lng6z                       4m           15Mi
kube-system            kube-flannel-ds-nhgfr                       4m           19Mi
kube-system            kube-flannel-ds-tj9ks                       3m           12Mi
kube-system            kube-flannel-ds-tq96j                       3m           14Mi
kube-system            kube-flannel-ds-zxt7t                       5m           19Mi
kube-system            kube-proxy-8vg69                            14m          18Mi
kube-system            kube-proxy-bz7cx                            8m           18Mi
kube-system            kube-proxy-cbdx8                            14m          25Mi
kube-system            kube-proxy-dg8x5                            18m          23Mi
kube-system            kube-proxy-f8hkk                            13m          15Mi
kube-system            kube-proxy-fcxg6                            13m          14Mi
kube-system            kube-proxy-qllwh                            21m          18Mi
kube-system            kube-proxy-srndp                            14m          24Mi
kube-system            kube-proxy-x6vcp                            13m          14Mi
kube-system            kube-proxy-xkt2j                            16m          14Mi
kube-system            kube-proxy-xrzg4                            8m           18Mi
kube-system            kube-scheduler-ubuntu                       4m           24Mi
kube-system            metrics-server-74774dcf94-4cgvj             5m           24Mi
kubernetes-dashboard   dashboard-metrics-scraper-c45b7869d-nvg8x   1m           12Mi
kubernetes-dashboard   kubernetes-dashboard-576cb95f94-fxgz4       1m           17Mi
现在,我们安装 KubeSphere。具体安装步骤请参考官方文档 2,此处不再展示安装细节。如果一切顺利,应当可以看到如下内容:
k8s@ubuntu:~/learn-k8s/16-kubesphere$ k get po -A | grep kubesphere
kubesphere-controls-system     default-http-backend-5bf68ff9b8-8hv4s              1/1     Running     0               25m
kubesphere-controls-system     kubectl-admin-6dbcb94855-lzxvg                     1/1     Running     0               17m
kubesphere-devops-system       devops-27276750--1-zc9lq                           0/1     Completed   0               6m32s
kubesphere-devops-system       devops-apiserver-77484746cb-n7h57                  1/1     Running     0               20m
kubesphere-devops-system       devops-controller-7dc9554b48-wj87r                 1/1     Running     0               20m
kubesphere-devops-system       devops-jenkins-5d744f66b9-25hq7                    1/1     Running     2 (9m34s ago)   20m
kubesphere-devops-system       s2ioperator-0                                      1/1     Running     0               20m
kubesphere-logging-system      elasticsearch-logging-data-0                       1/1     Running     0               26m
kubesphere-logging-system      elasticsearch-logging-data-1                       1/1     Running     0               23m
kubesphere-logging-system      elasticsearch-logging-data-2                       1/1     Running     0               22m
kubesphere-logging-system      elasticsearch-logging-discovery-0                  1/1     Running     0               26m
kubesphere-logging-system      elasticsearch-logging-discovery-1                  1/1     Running     0               23m
kubesphere-logging-system      elasticsearch-logging-discovery-2                  1/1     Running     0               22m
kubesphere-logging-system      fluent-bit-5fh6d                                   1/1     Running     0               24m
kubesphere-logging-system      fluent-bit-8bvs6                                   1/1     Running     0               24m
kubesphere-logging-system      fluent-bit-98nnr                                   1/1     Running     0               24m
kubesphere-logging-system      fluent-bit-9snp7                                   1/1     Running     0               24m
kubesphere-logging-system      fluent-bit-fsfxt                                   1/1     Running     0               24m
kubesphere-logging-system      fluent-bit-g25ml                                   1/1     Running     0               24m
kubesphere-logging-system      fluent-bit-jq64v                                   1/1     Running     0               24m
kubesphere-logging-system      fluent-bit-l7vlq                                   1/1     Running     0               24m
kubesphere-logging-system      fluent-bit-qjrvn                                   1/1     Running     0               24m
kubesphere-logging-system      fluent-bit-rk2mw                                   1/1     Running     0               24m
kubesphere-logging-system      fluent-bit-tdgk6                                   1/1     Running     0               24m
kubesphere-logging-system      fluentbit-operator-745bf5559f-4cf6f                1/1     Running     0               26m
kubesphere-logging-system      ks-events-exporter-59d48f6777-wwmfg                2/2     Running     0               21m
kubesphere-logging-system      ks-events-operator-5944645757-9dlxz                1/1     Running     0               21m
kubesphere-logging-system      ks-events-ruler-575669b4-nkt9g                     2/2     Running     0               21m
kubesphere-logging-system      ks-events-ruler-575669b4-xhzfr                     2/2     Running     0               21m
kubesphere-logging-system      kube-auditing-operator-84857bf967-6bv85            1/1     Running     0               22m
kubesphere-logging-system      kube-auditing-webhook-deploy-64cfb8c9f8-6nftf      1/1     Running     0               22m
kubesphere-logging-system      kube-auditing-webhook-deploy-64cfb8c9f8-8lkhn      1/1     Running     0               22m
kubesphere-logging-system      logsidecar-injector-deploy-5fb6fdc6dd-4sfv9        2/2     Running     0               21m
kubesphere-logging-system      logsidecar-injector-deploy-5fb6fdc6dd-q4l4z        2/2     Running     0               21m
kubesphere-monitoring-system   alertmanager-main-0                                2/2     Running     0               19m
kubesphere-monitoring-system   alertmanager-main-1                                2/2     Running     0               18m
kubesphere-monitoring-system   alertmanager-main-2                                2/2     Running     0               18m
kubesphere-monitoring-system   kube-state-metrics-5547ddd4cc-7zwlq                3/3     Running     0               19m
kubesphere-monitoring-system   node-exporter-42hh4                                2/2     Running     0               19m
kubesphere-monitoring-system   node-exporter-5cvwl                                2/2     Running     0               19m
kubesphere-monitoring-system   node-exporter-5rl89                                2/2     Running     0               19m
kubesphere-monitoring-system   node-exporter-67vbg                                2/2     Running     0               19m
kubesphere-monitoring-system   node-exporter-9cchq                                2/2     Running     0               19m
kubesphere-monitoring-system   node-exporter-b67r9                                2/2     Running     0               19m
kubesphere-monitoring-system   node-exporter-bc7f9                                2/2     Running     0               19m
kubesphere-monitoring-system   node-exporter-cxmmx                                2/2     Running     0               19m
kubesphere-monitoring-system   node-exporter-fm2zh                                2/2     Running     0               19m
kubesphere-monitoring-system   node-exporter-pqv4g                                2/2     Running     0               19m
kubesphere-monitoring-system   node-exporter-tjf7p                                2/2     Running     0               19m
kubesphere-monitoring-system   notification-manager-deployment-78664576cb-4j64q   2/2     Running     0               17m
kubesphere-monitoring-system   notification-manager-deployment-78664576cb-hw54c   2/2     Running     0               17m
kubesphere-monitoring-system   notification-manager-operator-7d44854f54-f55l4     2/2     Running     0               18m
kubesphere-monitoring-system   prometheus-k8s-0                                   2/2     Running     1 (4m ago)      19m
kubesphere-monitoring-system   prometheus-k8s-1                                   2/2     Running     1 (4m ago)      18m
kubesphere-monitoring-system   prometheus-operator-5c5db79546-fpcs8               2/2     Running     0               19m
kubesphere-monitoring-system   thanos-ruler-kubesphere-0                          2/2     Running     0               18m
kubesphere-monitoring-system   thanos-ruler-kubesphere-1                          2/2     Running     0               18m
kubesphere-system              ks-apiserver-6ff959b4cb-d4x4b                      1/1     Running     0               17m
kubesphere-system              ks-console-565df7f477-lptb5                        1/1     Running     0               25m
kubesphere-system              ks-controller-manager-6477858f96-5gdk4             1/1     Running     0               17m
kubesphere-system              ks-installer-7fbc5d568f-p6kjv                      1/1     Running     0               29m
kubesphere-system              minio-859cb4d777-wt8jq                             1/1     Running     0               27m
kubesphere-system              openldap-0                                         1/1     Running     1 (27m ago)     27m
kubesphere-system              openpitrix-import-job--1-5l8sx                     0/1     Completed   0               23m
kubesphere-system              redis-8f84d9fdd-l2t8l                              1/1     Running     0               28m
ks-console 以 NodePort 的方式被部署,映射到节点的 30880 端口。
以默认的账户(admin + P@88w0rd)登录,可以看到集群的全部信息。下面展示了本集群的 Overview 页面:

使用 KubeSphere 部署单个应用
当我们需要部署一个应用时,应当重点思考如下内容:
- 这个应用的镜像是什么?启动命令是什么?是否有环境变量?暴露哪些端口?
- 这个应用是有状态的?还是无状态的?
- 这个应用需要哪些配置信息?
- 这个应用需要哪些存储卷?分别用于存储本应用的何种数据?
接下来以 MySQL 的部署为例进行分析。首先,在 DockerHub 上查阅官方镜像 mysql:5.7.35 的说明,可以发现启动命令为:
docker run -p 3306:3306 --name mysql-01 \
-v /mydata/mysql/log:/var/log/mysql \
-v /mydata/mysql/data:/var/lib/mysql \
-v /mydata/mysql/conf:/etc/mysql/conf.d \
-e MYSQL_ROOT_PASSWORD=root \
--restart=always \
-d mysql:5.7.35
这意味着:
- 启动命令默认为 Dockerfile 中的启动命令,无需特别关注。需要设定环境变量
MYSQL_ROOT_PASSWORD=root,暴露端口为3306; - 数据库作为一种中间件,存在需要被持久化的数据,必然以有状态应用的方式部署;
- 启动配置在
/etc/mysql/conf.d中,需要创建一个对应的 ConfigMap 并录入配置信息; - 数据被存放在
/var/lib/mysql中,需要创建一个对应的存储卷并绑定; - 如果需要持久化日志信息,也需要创建一个存储卷并挂载到
/var/log/mysql目录下。
根据以上分析,我们可以很轻易地写出对应的资源清单文件:
kind: StatefulSet
apiVersion: apps/v1
metadata:
  name: his-mysql
  namespace: his
  labels:
    app: his-mysql
  annotations:
    kubesphere.io/creator: admin
spec:
  replicas: 1
  selector:
    matchLabels:
      app: his-mysql
  template:
    metadata:
      creationTimestamp: null
      labels:
        app: his-mysql
      annotations:
        logging.kubesphere.io/logsidecar-config: '{}'
    spec:
      volumes:
        # 创建三个存储卷。分别用于和宿主机同步时间、存储数据库数据、设定配置信息
        - name: host-time
          hostPath:
            path: /etc/localtime
            type: ''
        - name: volume-nbawbw
          persistentVolumeClaim:
            claimName: mysql-pvc
        - name: volume-2gsuec
          configMap:
            name: mysql-conf
            defaultMode: 420
      containers:
        - name: container-hm42s8
          image: 'mysql:5.7.35'
          ports:
            # 配置端口
            - name: tcp-3306
              containerPort: 3306
              protocol: TCP
            - name: tcp-33060
              containerPort: 33060
              protocol: TCP
          env:
            # 设定环境变量
            - name: MYSQL_ROOT_PASSWORD
              value: '123456'
          resources:
            limits:
              cpu: 200m
              memory: 500Mi
          volumeMounts:
            # 挂载三个存储卷
            - name: host-time
              readOnly: true
              mountPath: /etc/localtime
            - name: volume-nbawbw
              mountPath: /var/lib/mysql
            - name: volume-2gsuec
              readOnly: true
              mountPath: /etc/mysql/conf.d
          terminationMessagePath: /dev/termination-log
          terminationMessagePolicy: File
          imagePullPolicy: IfNotPresent
      restartPolicy: Always
      terminationGracePeriodSeconds: 30
      dnsPolicy: ClusterFirst
      serviceAccountName: default
      serviceAccount: default
      securityContext: {}
      schedulerName: default-scheduler
  serviceName: his-mysql-rb09     # 同时创建一个 Headless Service
  podManagementPolicy: OrderedReady
  updateStrategy:
    type: RollingUpdate
    rollingUpdate:
      partition: 0
  revisionHistoryLimit: 10
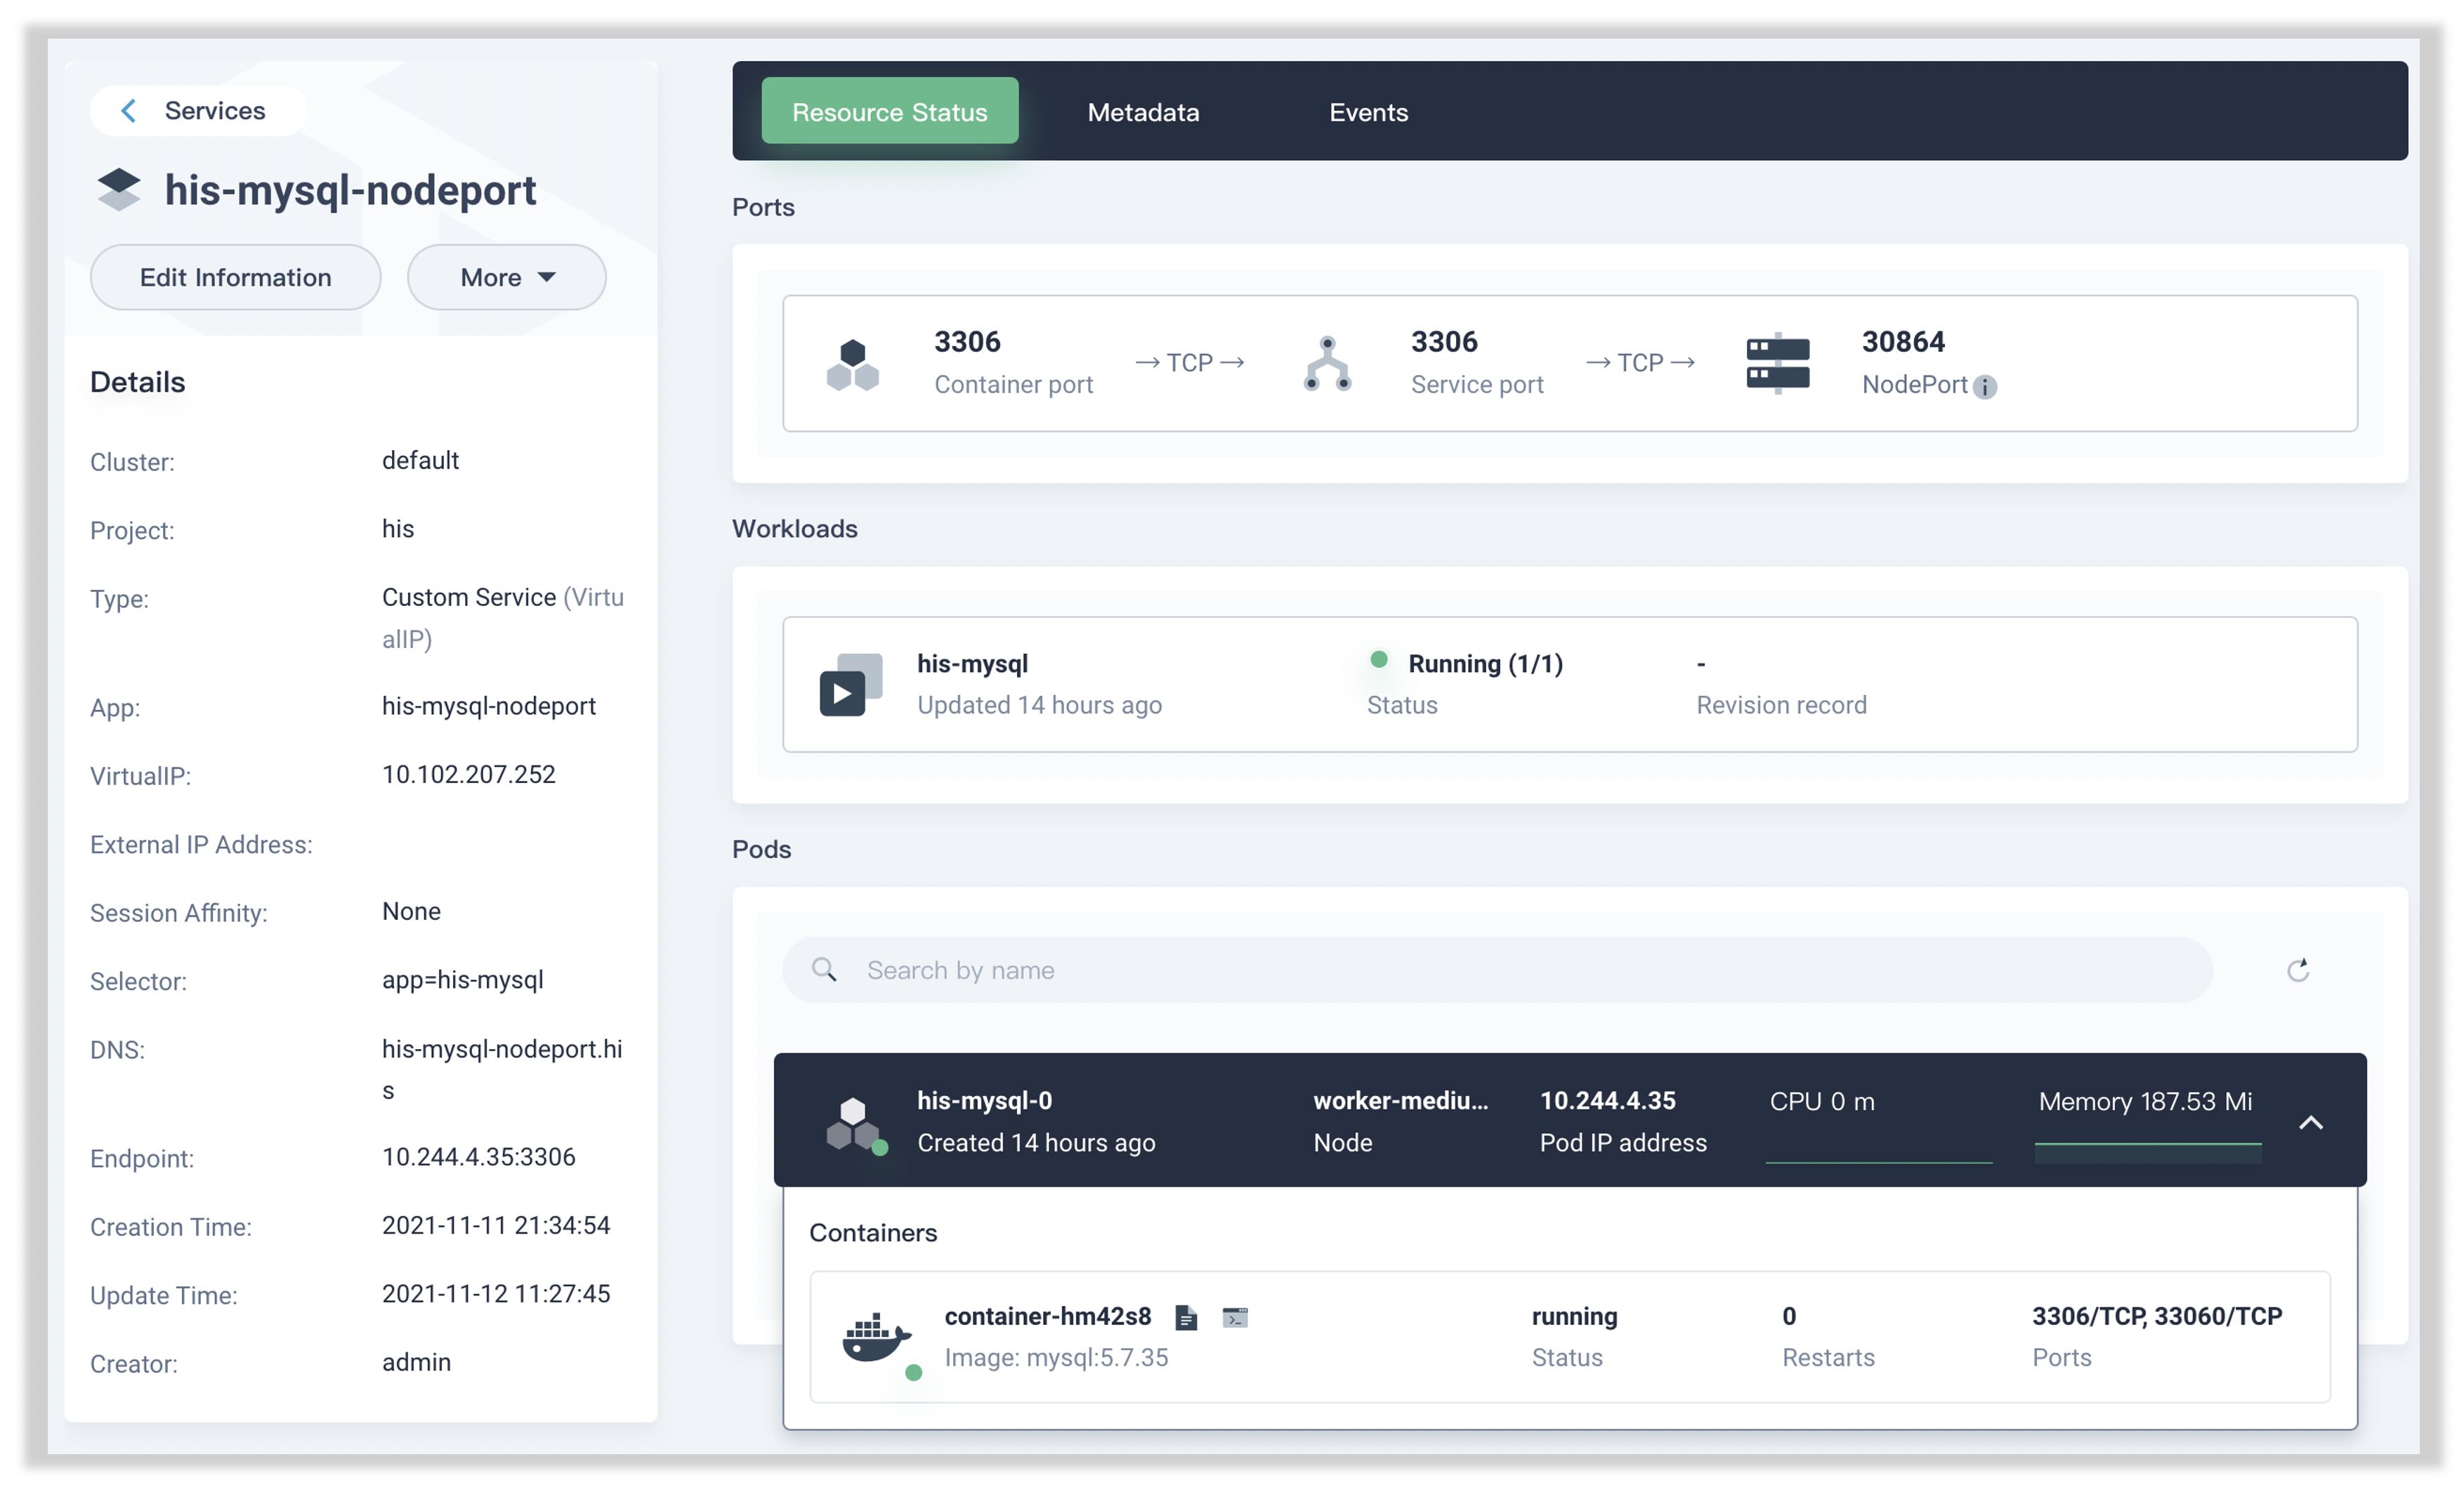
在 KubeSphere 中我们只需要点点鼠标就可以完成所有资源对象的创建,读者可自行把玩,此处不在展示相关截图。实际上,上述资源清单正是由 KubeSphere 根据创建结果自动生成的。 接下来,我们删除默认生成的 Headless Service,然后手动创建一个 NodePort 类型的 Service,使得 MySQL 实例可以被子网内节点访问。如果一切顺利,应该可以看到:
如果还想再轻松一些,我们还可以直接在 KubeSphere 提供的 App Store 中点击一键式部署 3,这样我们连 Volume 和 ConfigMap 的创建与挂载都不用操作了。
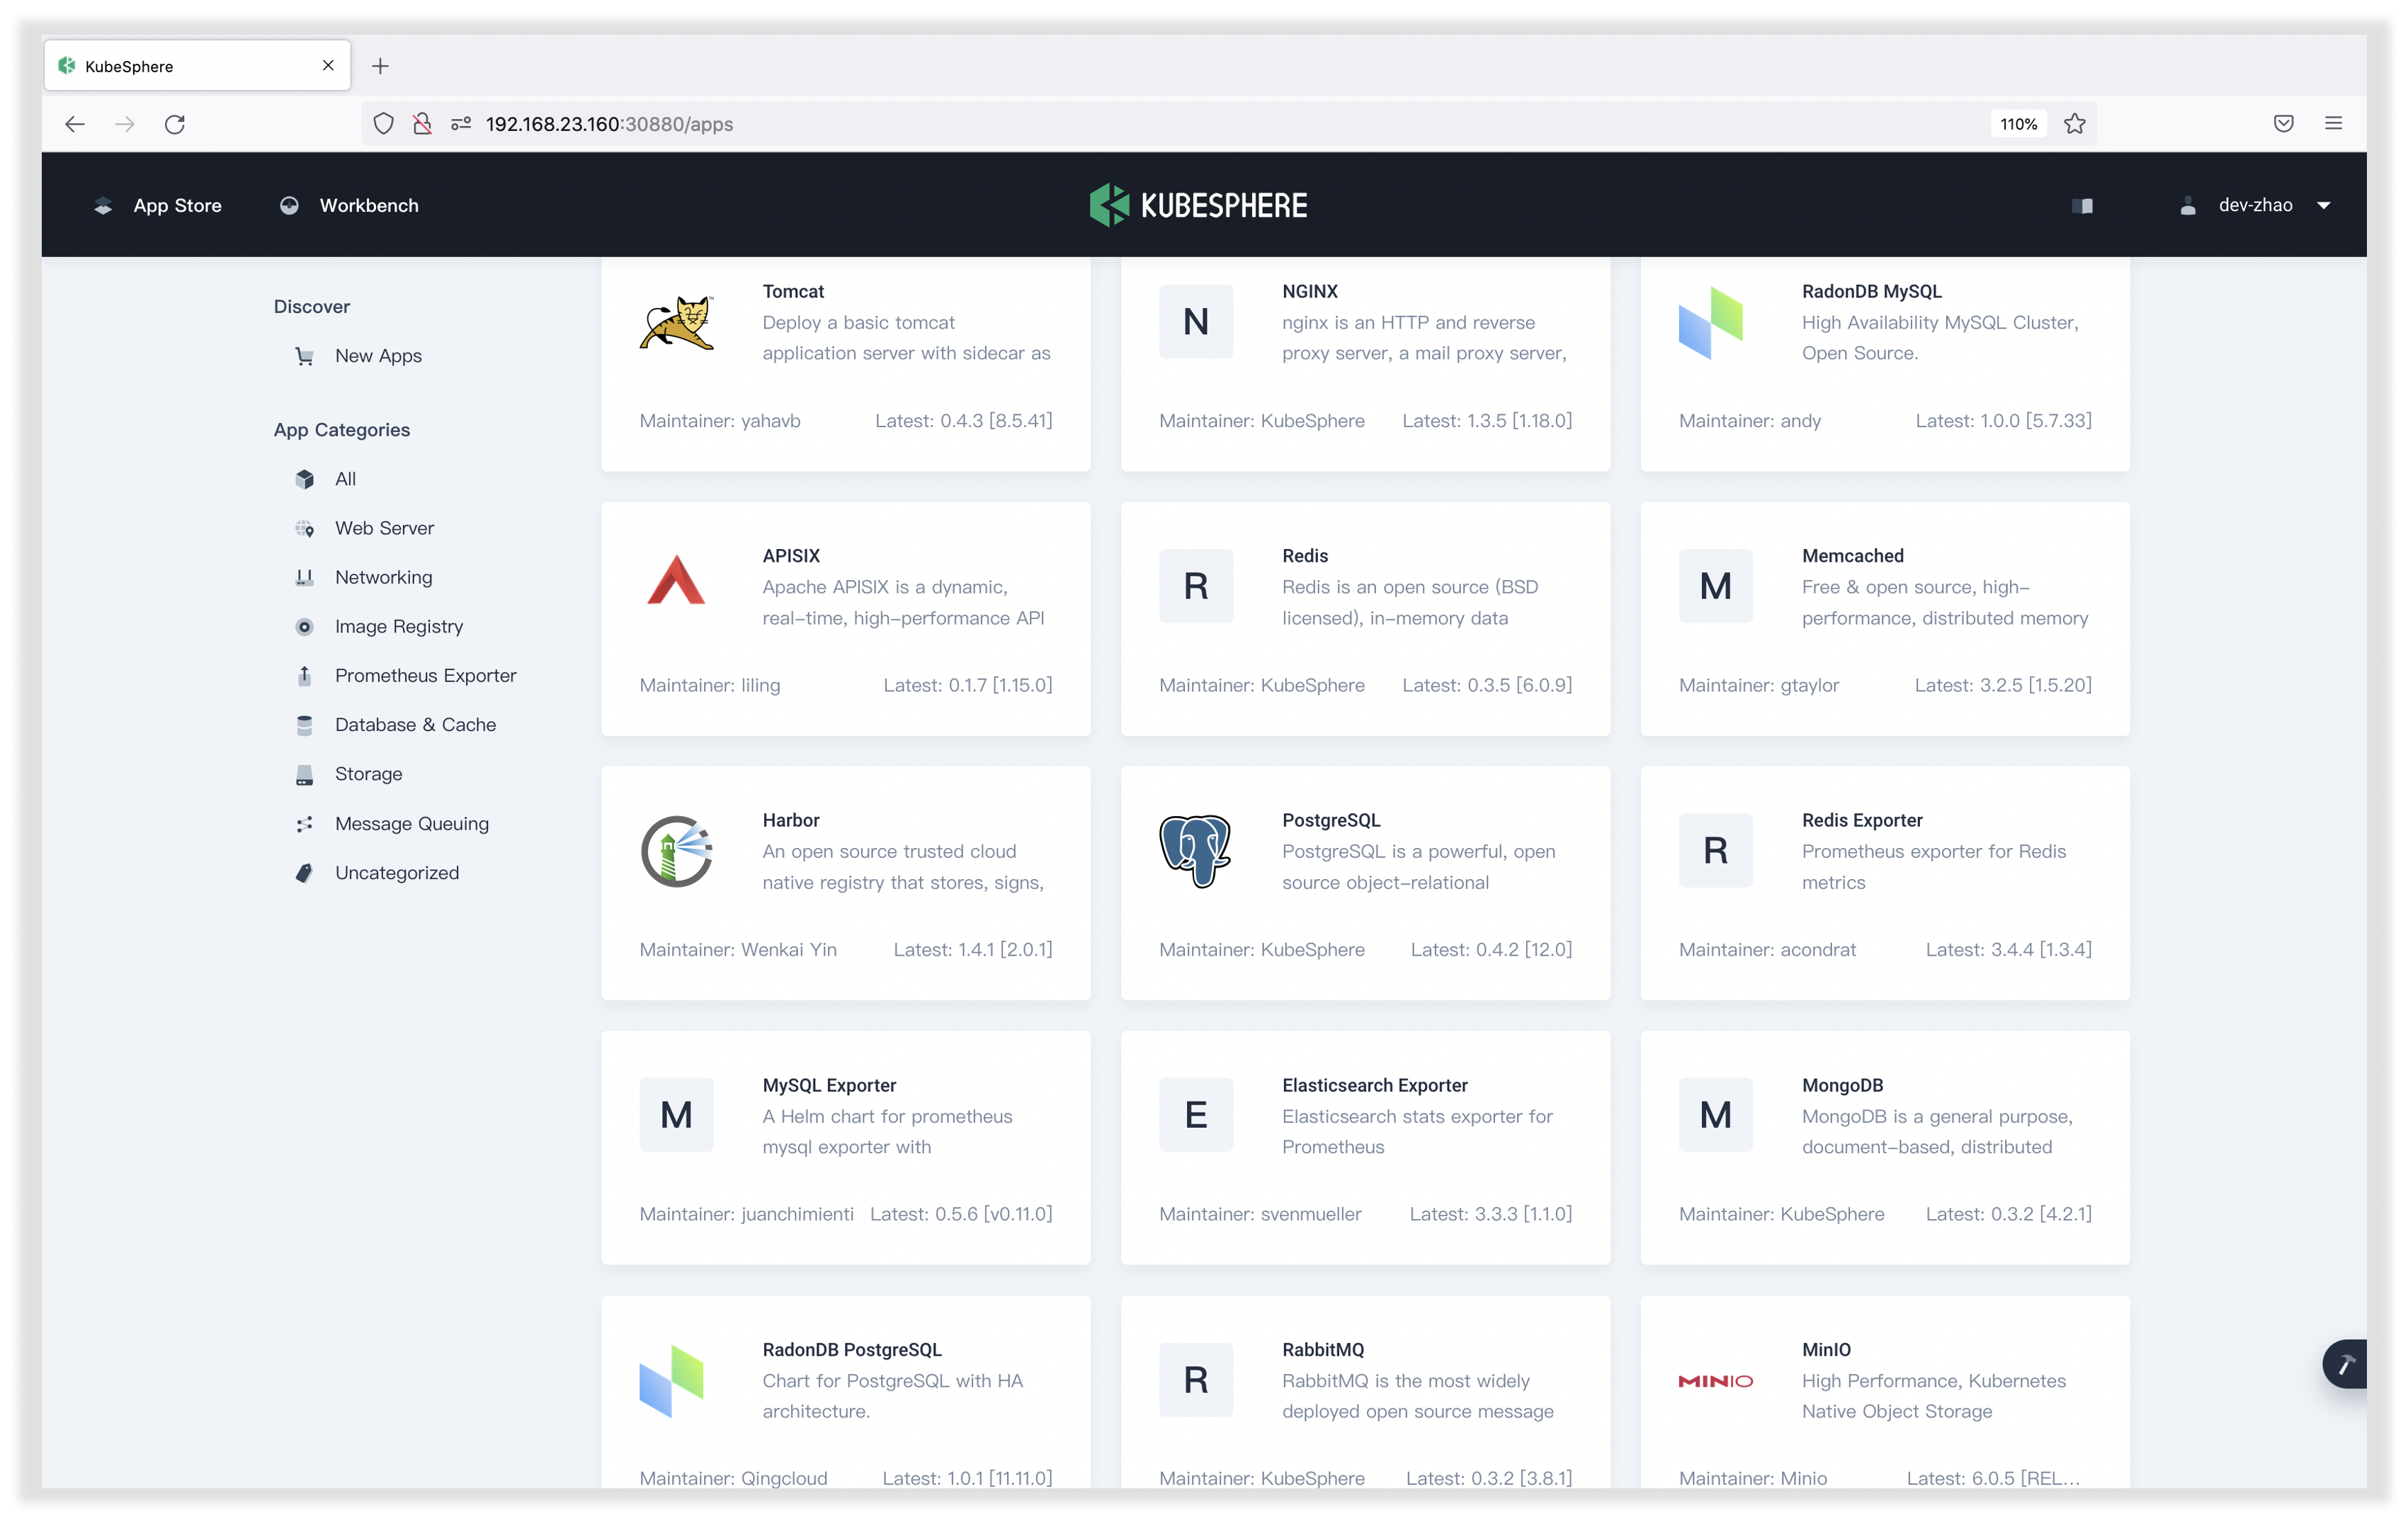
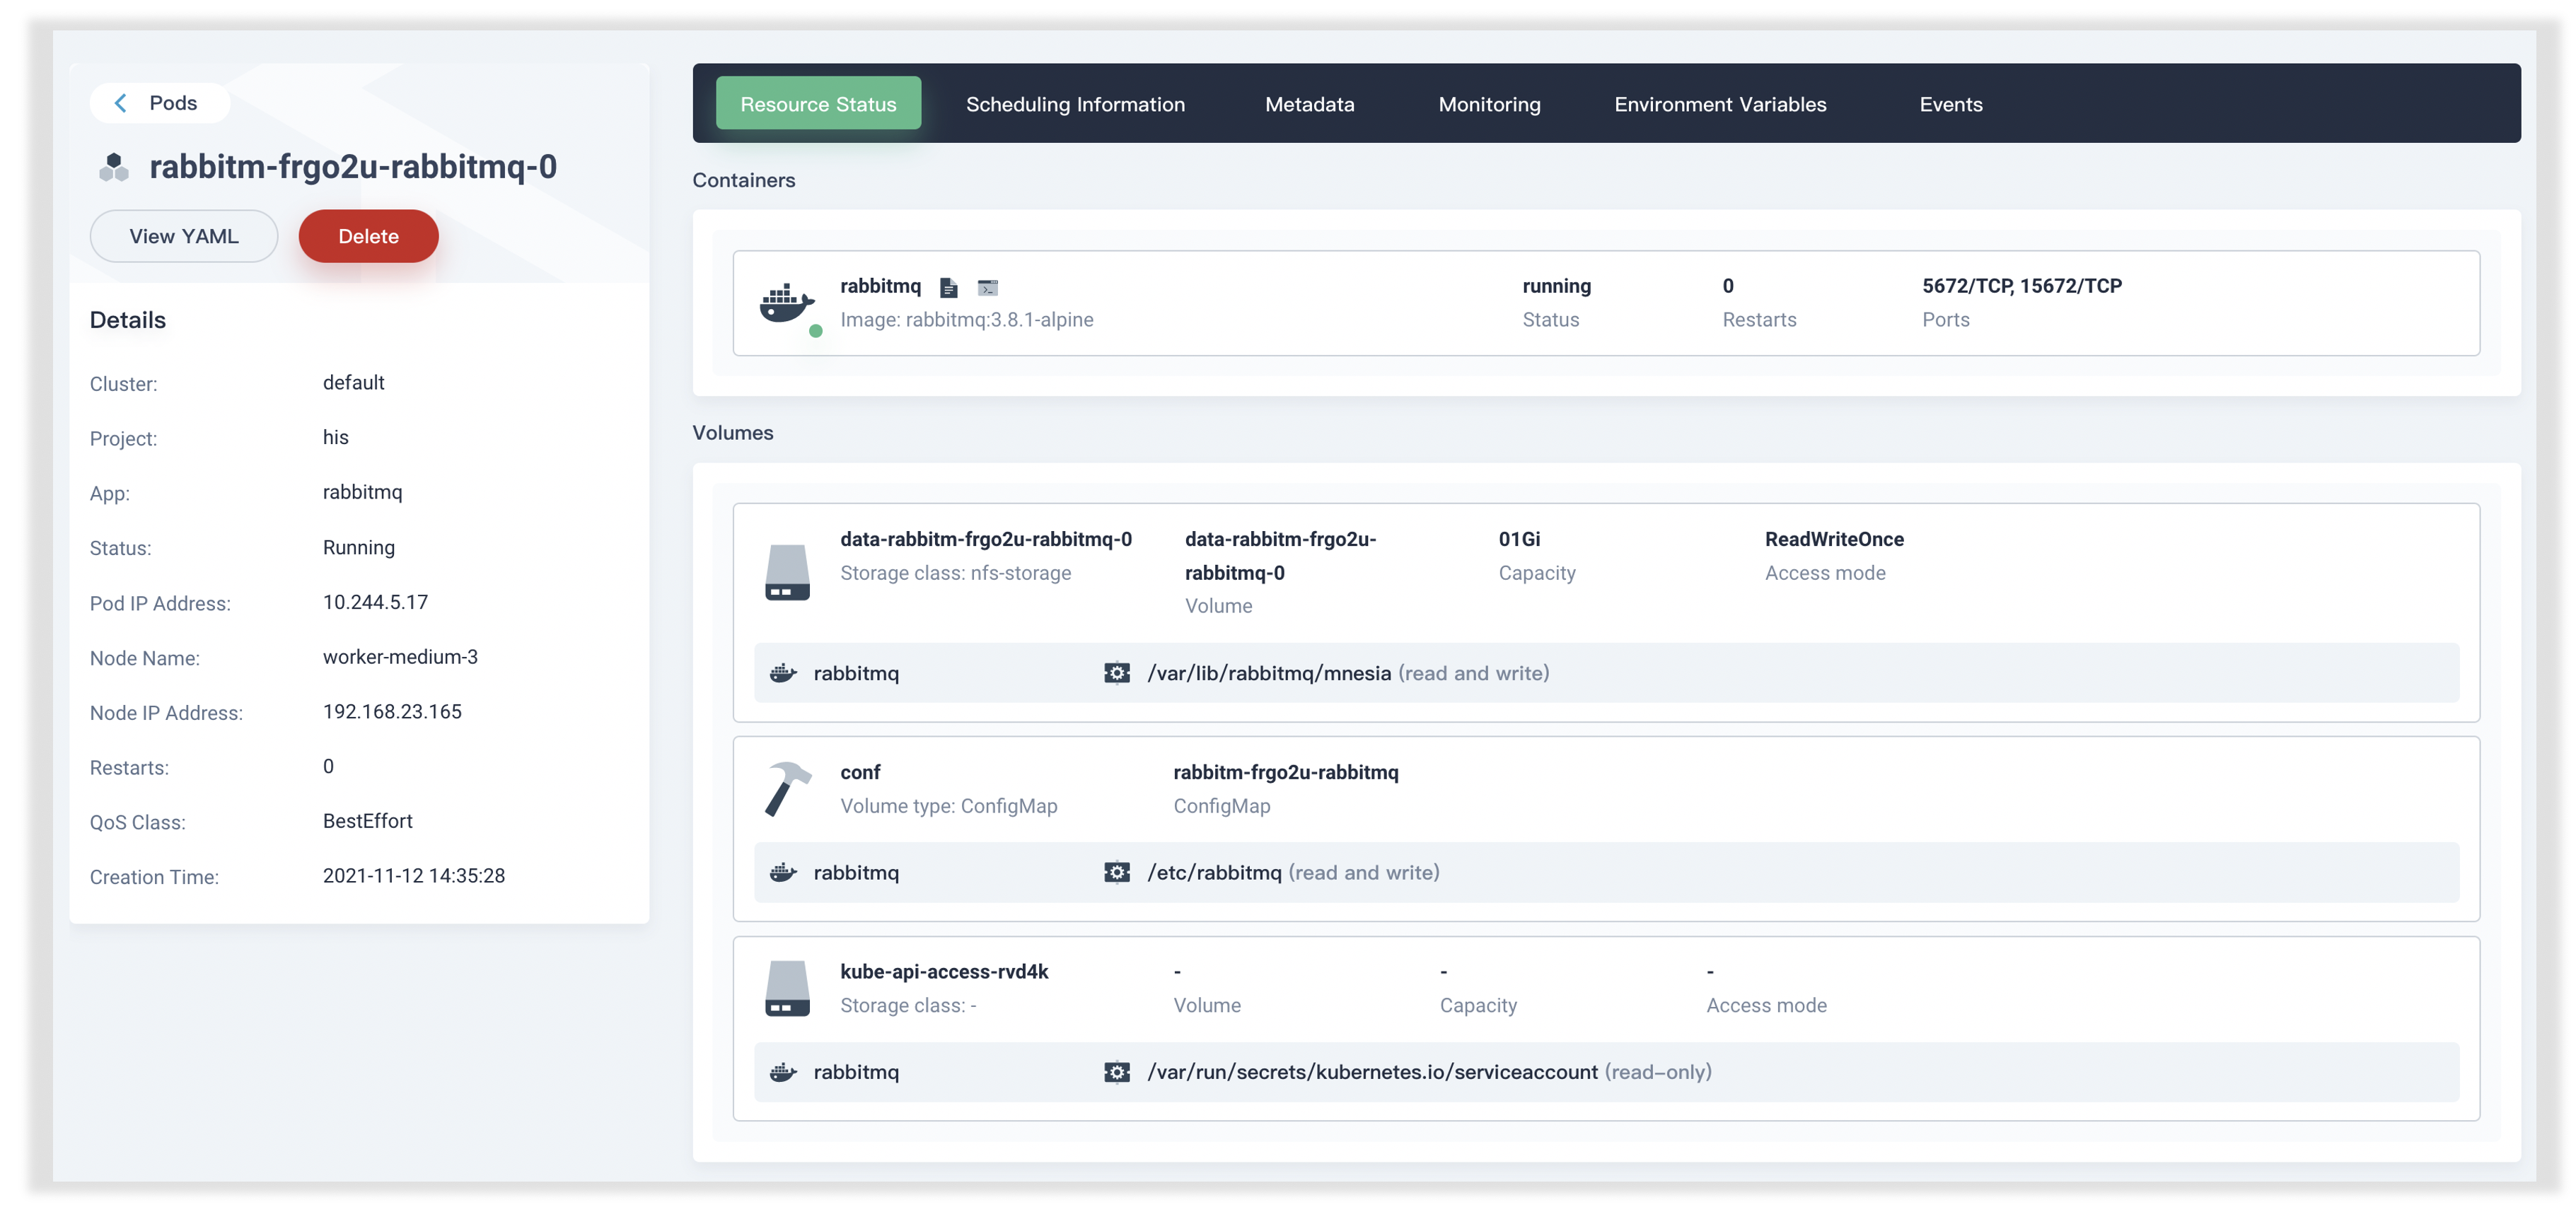
我们在 App Store 中一键式部署 RabbitMQ,可以发现 Volume 和 ConfigMap 都已自动为我们创建:
总结
本文主要介绍了 KubeSphere 的安装与基本使用。 实际上,KubeSphere 的强大之处在于它可以大大简化复杂项目的部署,我将在后续文章中向读者展示这一点。
转载申请

本作品采用 知识共享署名 4.0 国际许可协议 进行许可,转载时请注明原文链接。您必须给出适当的署名,并标明是否对本文作了修改。
-
KubeSphere 官方网站为 https://kubesphere.com.cn/。 ↩︎
-
https://kubesphere.com.cn/docs/quick-start/minimal-kubesphere-on-k8s/ ↩︎
-
除了 App Store,还可以在 KubeSphere 中添加镜像仓库(如 bitnami 官方镜像仓库)通过 Helm 一键式部署。这大大丰富了可一键式部署的镜像数量。 ↩︎